Synology Dynamic DNS with Cloudflare for both multidomains and subdomains
Table of contents
- What this script does
- Before you begin
- How to install
- Troubleshooting and known issues
- CloudFlare API free domains limitation
- Connection test failed or error returned
- Cloudflare no longer listed as a DDNS provider after a DSM update
- Default Cloudflare ports
- Debug script
What this script does
- A PHP script for Synology DSM (and potentially Synology SRM devices) adding support for Cloudflare to Network Centre > Dynamic DNS (DDNS).
- Supports single domains, multidomains, subdomains and regional domains, or any combination thereof (example: dev.my.domain.com.au, domain.com.uk etc)
- Easy instalation process
- Based on CloudFlare API v4
- Supports dual stack IPv4 and IPv6
Before you begin
Before starting the installation process, make sure you have (and know) the following information, or have completed these steps:
-
Cloudflare credentials:
a. Know your Cloudflare account username (or register for an account if you're new to Cloudflare); and
b. Have your API key - no need to use your Global API key! (More info: API keys).
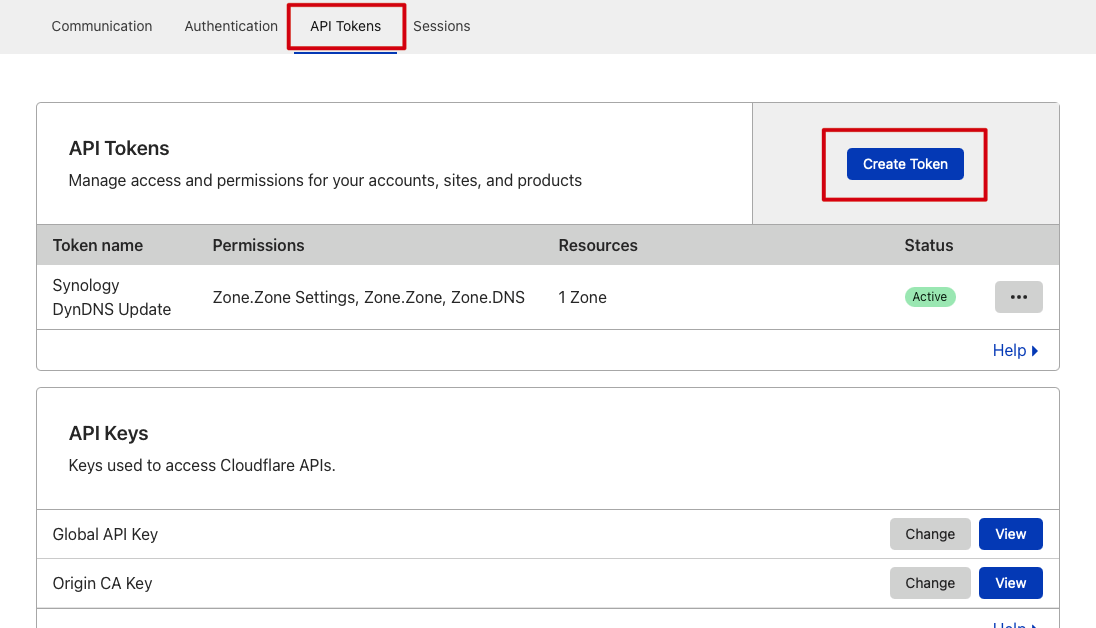
c. Create a API key with following (3) permissions:
Zone > Zone.Settings > Read
Zone > Zone > Read
Zone > DNS > EditThe affected zone ressouces have to be (at least):
Include > All zones from an account >
<domain> -
DNS settings:
Ensure the DNS A record(s) for the domain/zone(s) you wish to update with this script have been created (More information: Managing DNS records).
Your DNS records should appear (or already be setup as follows) in Cloudflare:
(Note: Having Proxied turned on for your A records isn't necessary, but it will prevent those snooping around from easily finding out your current IP address)

-
SSH access to your Synology device:
If you haven't setup this access, see the following Synology Knowledge Base article: [How can I sign in to DSM/SRM with root privilege via SSH?[(https://kb.synology.com/en-id/DSM/tutorial/How_to_login_to_DSM_with_root_permission_via_SSH_Telnet)
- SRM users: Knowledge of vi:
vi is the only text editor available within the Busybox environment available at the SSH command line on devices running SRM.
For assistance with vi commands, see: Basic vi commands
How to install
-
SSH with root privledges on your supported device:
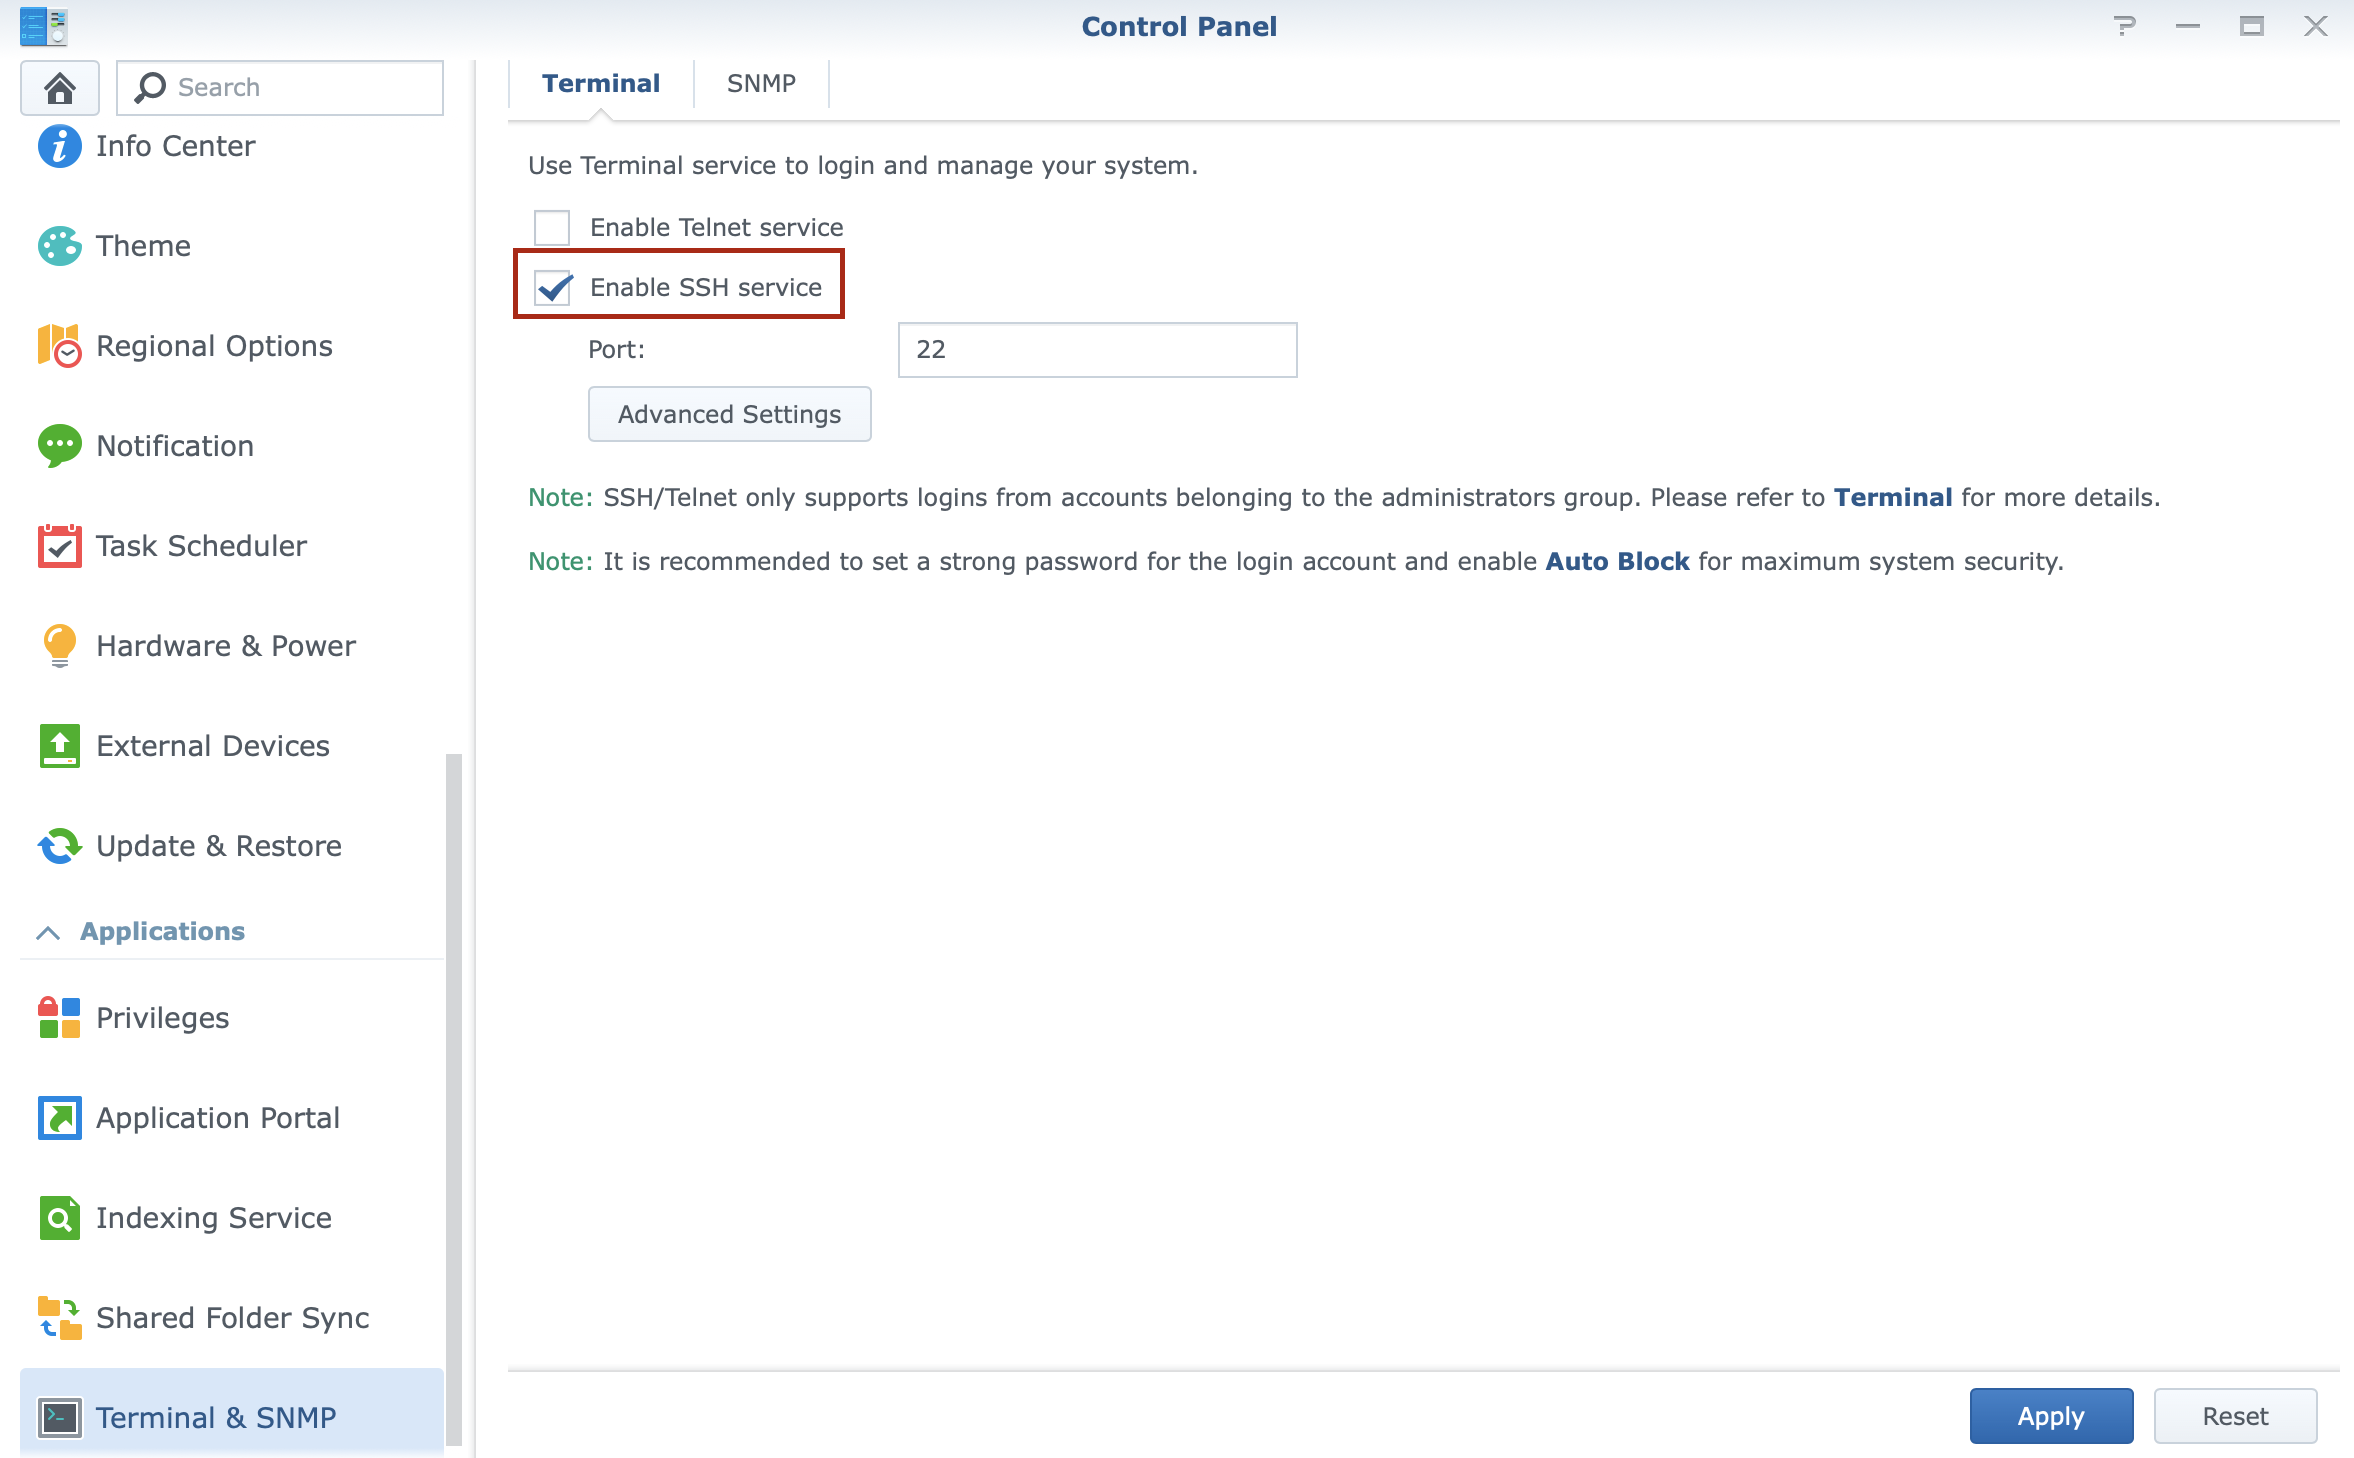
a. For DSM Users:
Navigate to Control Panel > Terminal & SNMP > Enable SSH service
b. For SRM users:
Navigate to Control Panel > Services > System Services > Terminal > Enable SSH service
-
Connect via SSH: Connect to your supported device via SSH and execute command
-
For DSM Users
wget https://raw.githubusercontent.com/mrikirill/SynologyDDNSCloudflareMultidomain/master/cloudflare.php -O /usr/syno/bin/ddns/cloudflare.php && sudo chmod 755 /usr/syno/bin/ddns/cloudflare.php -
For SRM Users Note: Ensure you are connected as root in your SSH session
wget https://raw.githubusercontent.com/mrikirill/SynologyDDNSCloudflareMultidomain/master/cloudflare.php -O /usr/syno/bin/ddns/cloudflare.php && chmod 755 /usr/syno/bin/ddns/cloudflare.phpNote: For SRM users, you must connect to your device as root. No other username will allow these commands to run.
-
Update DDNS provider list: Using a command line editor, insert the text below to your DMS file (Location : /etc.defaults/ddns_provider.conf), to add DDNS support via Cloudflare:
[Cloudflare]
  modulepath=/usr/syno/bin/ddns/cloudflare.php
  queryurl=https://www.cloudflare.com/
Note: For SRM users, break out this Vim cheat sheet, as it's the only text editor available to you.
-
Update your DDNS settings:
a. For DSM Users: Navigate to Control Panel > External Access > DDNS then add new DDNS
b. For SRM users: Navigate to Network Centre > Internet > QuickConnect & DDNS > DDNS and press the Add button:
Add/Update the DDNS settings screen as follows:
- Service provider: Select Cloudflare
-
Hostname: For a single domain: mydomain.com For multiple domains: subdomain.mydomain.com---vpn.mydomain.com (ensure each domain is seperated by three dashes: ---)
Note: there is 128 symbols limit on Hostname input * Username: The email address you use for logging in to Cloudflare (optional since the API key is sufficient) * Password: Your created Cloudflare API Key
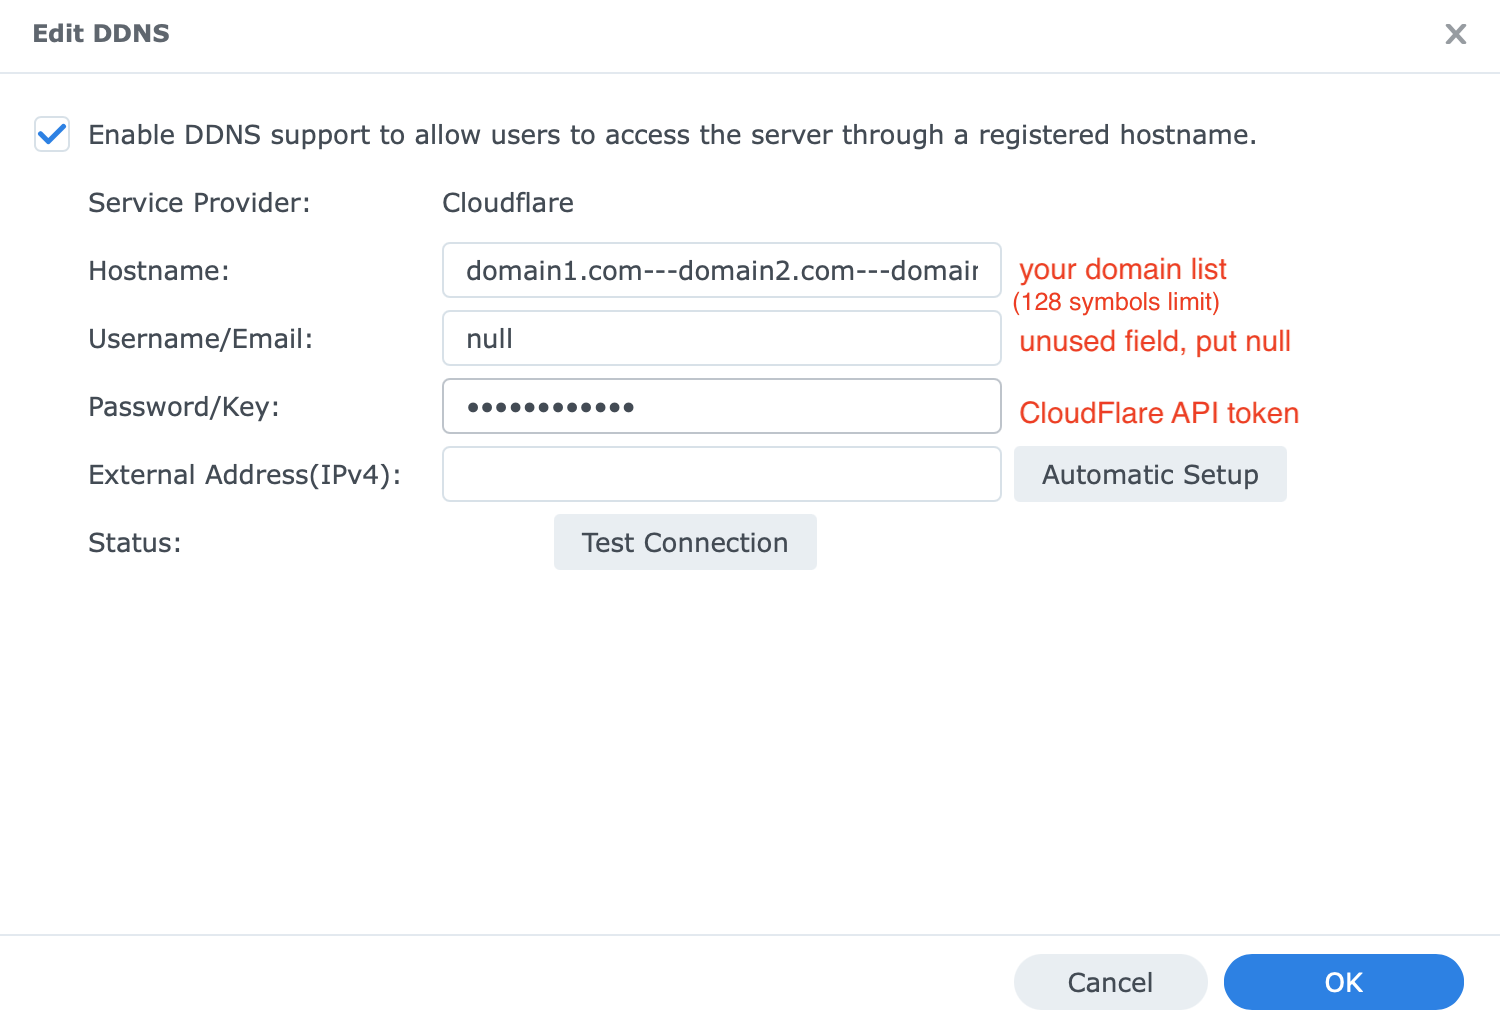
Finally, press the test connection button to confirm all information is correctly entered, before pressing Ok to save and confirm your details.
-
Enjoy 🍺 and don't forget to deactivate SSH (step 1) if you don't need it.
Troubleshooting and known issues
CloudFlare API free domains limitation
CloudFlare API doesn't support domains with a .cf, .ga, .gq, .ml, or .tk TLD (top-level domain)
For more details read here: https://github.com/mrikirill/SynologyDDNSCloudflareMultidomain/issues/28 and https://community.cloudflare.com/t/unable-to-update-ddns-using-api-for-some-tlds/167228/61
Response example:
{
  "result": null,
  "success": false,
  "errors": [
    {
      "code": 1038,
      "message": "You cannot use this API for domains with a .cf, .ga, .gq, .ml, or .tk TLD (top-level domain). To configure the DNS settings for this domain, use the Cloudflare Dashboard."
    }
  ],
  "messages": []
}
Connection test failed or error returned
This will manifest as either 1020 error; or the update attempt not showing in your Cloudflare Audit logs.
That generally means you may not have entered something correctly in the DDNS screen for your domain(s).
Revisit Before you begin to ensure you have all the right information, then go back to Step 4 in How to install to make sure everything is correctly entered.
Handy hint: You can also check your Cloudflare Audit logs to see what - if anything - has made it there with your API key (More information: Understanding Cloudflare Audit Logs). Updates using the API will appear in the Audit logs as a Rec Set action.
Cloudflare no longer listed as a DDNS provider after DSM or SRM updates
After system updates to either Synology DSM or SRM, you may find that: * /usr/syno/bin/ddns/cloudflare.php has been deleted; * /etc.defaults/ddns_provider.conf was reset to its default settings (settings for Cloudflare no longer included); and * The DDNS settings in your DDNS panel constantly show Cloudflare's status as loading.
If this occurs, simply repeat the How to install steps shown above.
Default Cloudflare ports
Source Identifying network ports compatible with Cloudflare's proxy
| HTTP ports supported by Cloudflare | HTTPS ports supported by Cloudflare |
|---|---|
| 80 | 443 |
| 8080 | 2053 |
| 8880 | 2083 |
| 2052 | 2087 |
| 2082 | 2096 |
| 2086 | 8443 |
| 2095 |
Debug
You can run this script directly to see output logs
-
SSH into your Synology system
-
Run this command:
/usr/bin/php -d open_basedir=/usr/syno/bin/ddns -f /usr/syno/bin/ddns/cloudflare.php "" "your-CloudFlare-token" "your---domains---divided---by---dashes" "ip-address"
- Check output logs
Credits
Table of contents generated with markdown-toc
DB Tech - creating API keys and using Cloudflare CNAME for single updates